Как убрать жучки с кузова: Как убрать жучки с кузова автомобиля своими руками? (осторожно много фото)
Добрый день. В сегодняшней статье я расскажу шаг за шагом, как убрать жучки с кузова автомобиля своими руками. Так же эта статья будет полезна, тем, кто решит обратиться к профессиональным малярам, чтобы понимать, что и сколько стоит.
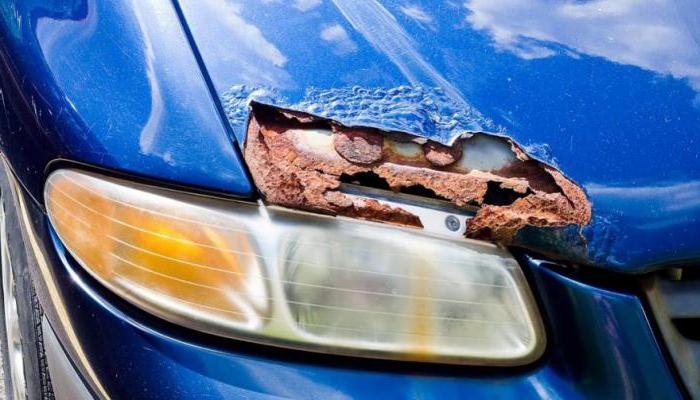
Что такое жучок на автомобиле?
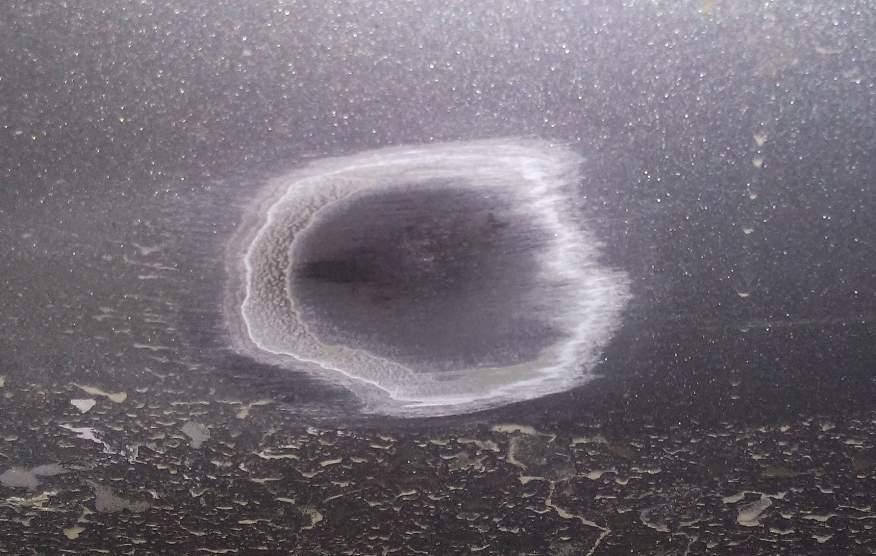
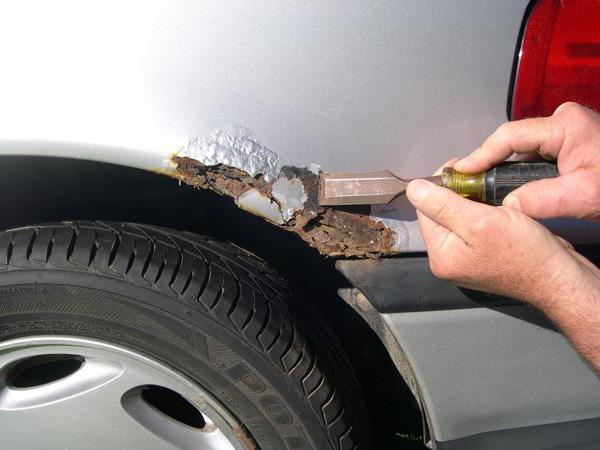
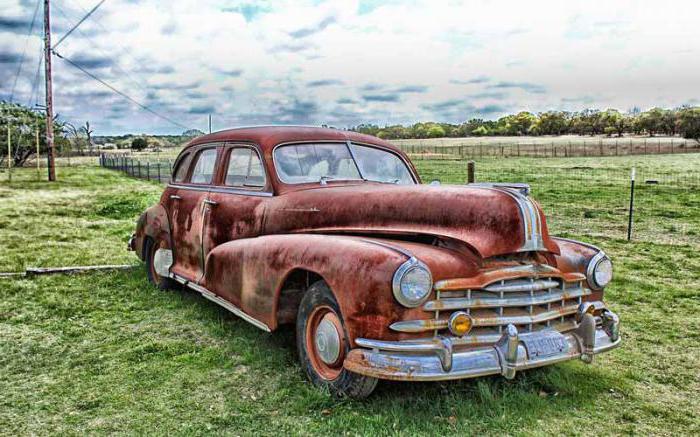
Все предельно просто – автомобиль, в большинстве случаев, сделан из железа, которое имеет неприятное свойство – ржаветь. Любое, даже микроскопическое повреждение краски до металла (не важно – скол, микротрещина или еще что) может привести к ситуации когда ржавчина идет не наружу, как на картинке:
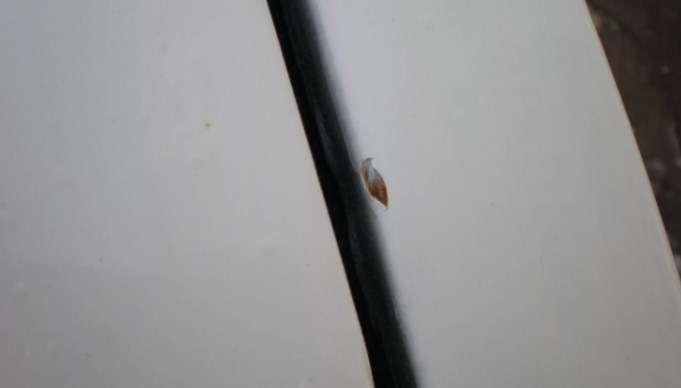
А под краску вот так:
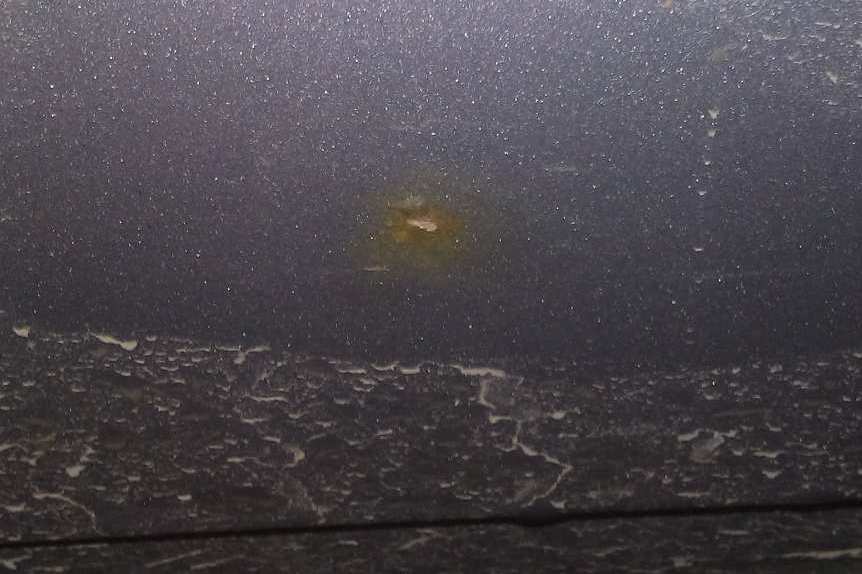
Так и получается жучок. Его бесполезно красить или полировать, он все равно возникнет снова, а если не убрать его вовремя, вообще может прогнить ДЫРА, и потребуются уже сварочные работы!
Сразу предупреждаю – недорого это сделать не выйдет! По уму такие детали перекрашиваются полностью, с полным вскрытием «жуков и паутинок», но реальность такова, что иногда можно обойтись и «малой кровью».
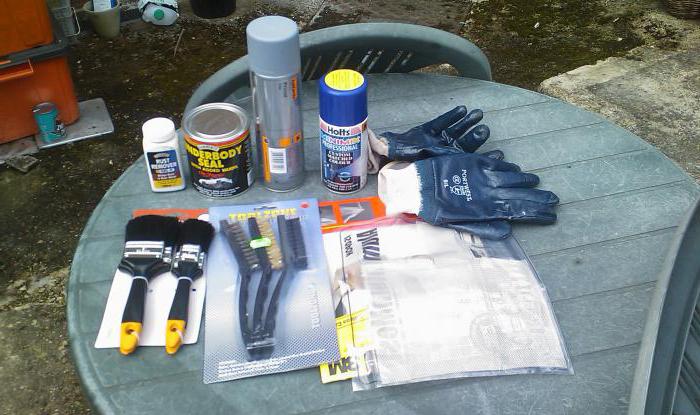
Необходимый инструмент:
Итак для того чтобы убрать жуки нам понадобится:
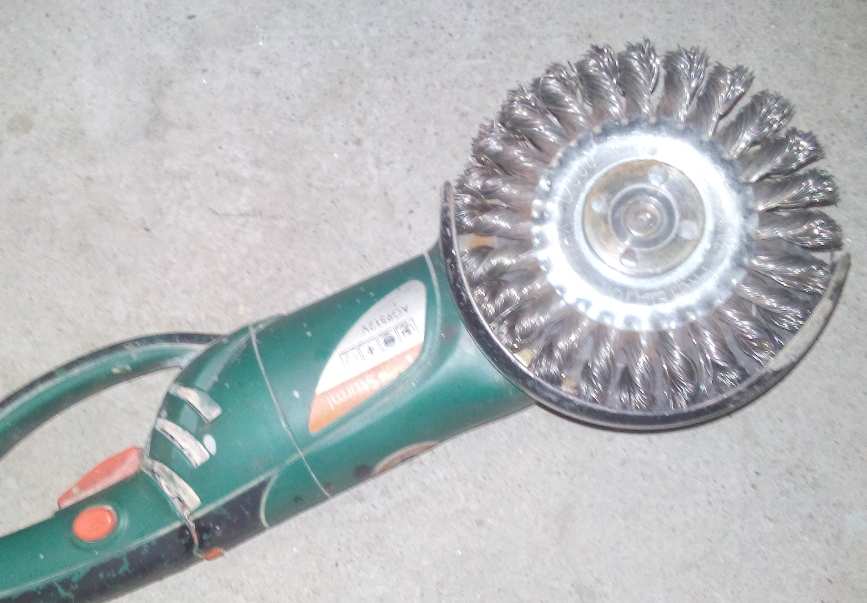
- Болгарка или дрель со щеткой
- Аэрограф (заказать в Китае)
- Машинка полировочная
- Наждачная бумага с номерами 80-120-180-240-360-500-600-800-1000-1500:
- Эпоксидный грунт
- Базовая эмаль в цвет (акрил или металлик)
- Лак (возможно)
- Шпатлевка универсальная (возможно)
- Паста полировочная 3м
Я прекрасно понимаю, что для того чтобы разово подкрасить жуки – покупать инструмент нецелесообразно! Но есть прокатные конторы, в которых вполне можно арендовать болгарку/дрель, полировочную машинку и компрессор. Поэтому, если вы решились самостоятельно убирать жуки, не стоит покупать весь инструмент.
К сожалению, аэрограф арендовать не получится, но начальные модели, пригодные только для мелкого ремонта, можно купить относительно недорого, в случае с РФ – от 1500р (2017 г) или, в Китае от 800р. Жуки, как правило, не требуют срочного ремонта и ожидание 30-40 дней не критично.
Пошаговая инструкция по удалению жуков с кузова автомобиля.
Шаг 1.
Осматриваем внимательно весь кузов на наличие повреждений, мы, когда ремонтировали машину из примера, пропустили 2 проблемных места.
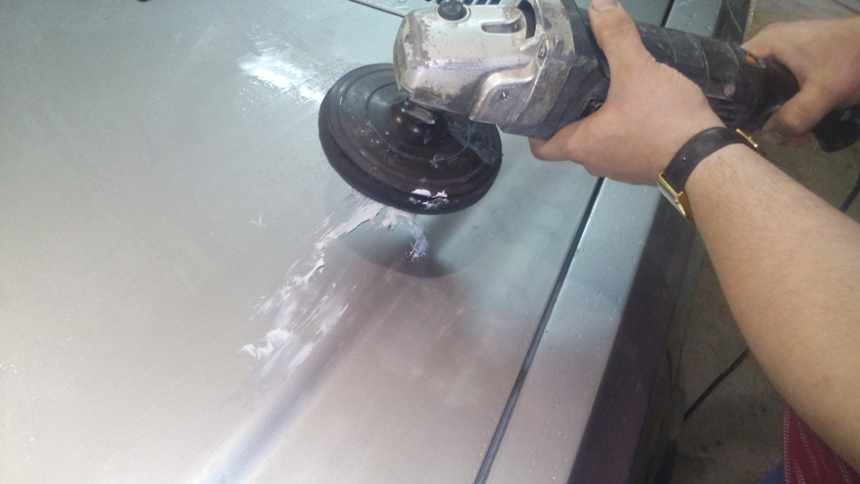
Шаг 2.
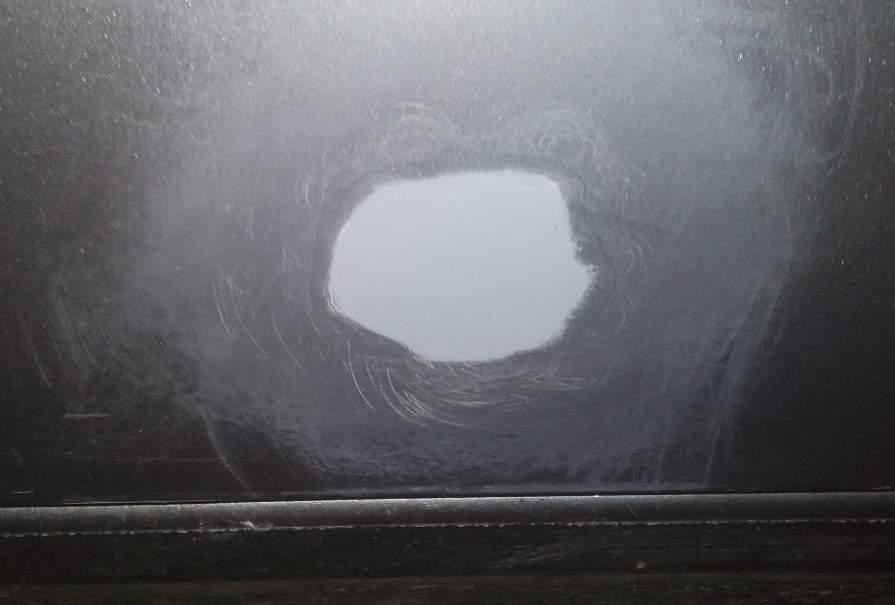
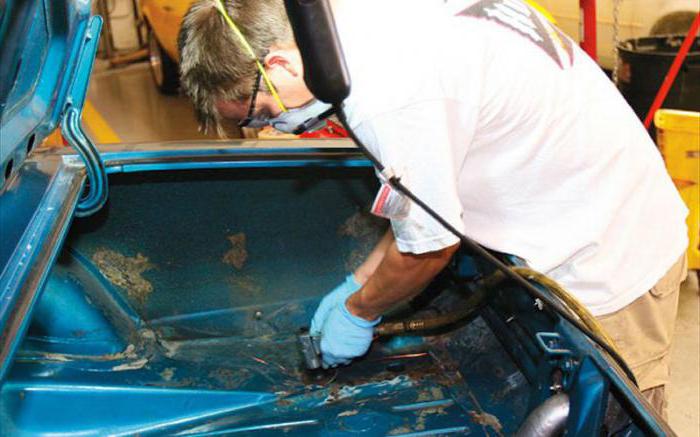
Болгаркой или дрелью (щетка – ершик), вскрываем все жуки с запасом. Т.е. когда вы убрали все вздутости краски, вы не убрали всю ржавчину и краску снова поднимет спустя 1-2 года. ОБЯЗАТЕЛЬНО убираем ржавчину полностью и отступаем от ее края на 5-10мм.
Шаг 3.
Про помощи наждачной бумаги с номерами 80-120-240 убираем ступеньку от щетки. И номерами 500-600-800 наносим мат на краску около поврежденного места, чтобы грунт не отвалился.
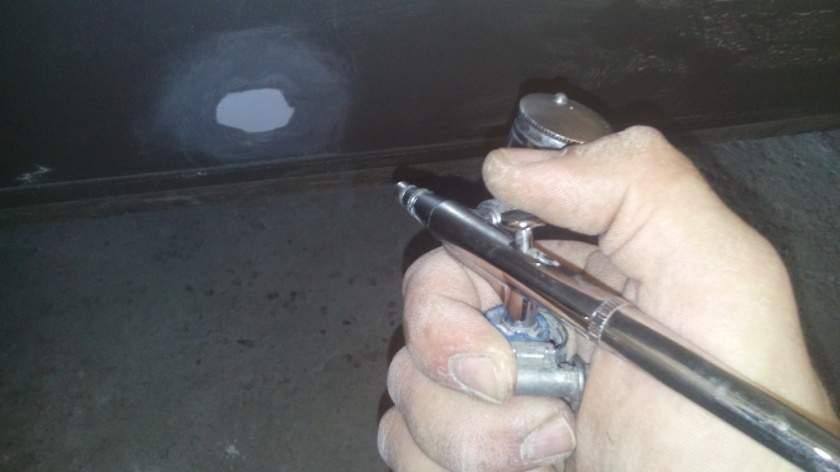
Шаг 4.
Обезжириваем ремонтный участок и грунтуем эпоксидным грунтом, при помощи аэрографа, или даже кисточкой (т.к. все равно потом обтачивать, но кисточкой можно нанести слой толще и обойтись без шпатлевки).
Шаг 5.
После полного высыхания грунта, при помощи наждачной бумаги с номерами 240-360-500-600-800, вытачиваем нанесенный грунт вровень с краской. Если сразу не получится это сделать, придется нанести еще и шпатлевку на поврежденный участок и снова обточить…. Ну или смириться с неровностями….
Мат надо наносить с запасом, особенно 800м номером т.к. на ровной поверхности краска и лак держаться не будут, а полировка уберет мелкие царапины от 800 номера наждачной бумаги.
Шаг 6.
Снова обезжириваем ремонтные места и при помощи аэрографа подкрашиваем повреждения в несколько слоев, выдерживая межслойную сушку в соответствие с рекомендациями производителей.
Если поврежденная деталь окрашена металликом, как в нашем примере, после высыхания базовой эмали, наносим 3-4 слоя лака.
В нашем примере цвет немного не попал, но это вопрос к подборщикам.
Шаг 7.
При помощи наждачной бумаги с номерами 1000-1500 убираем, переплыл краски/лака.
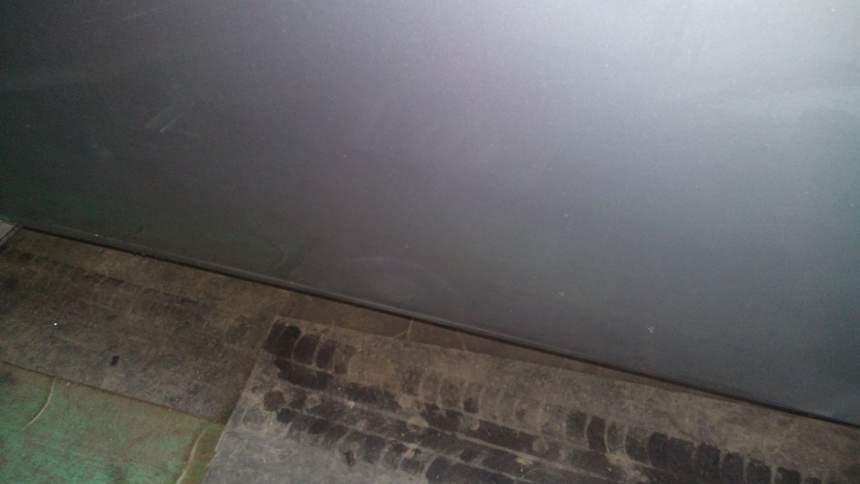
Шаг 8.
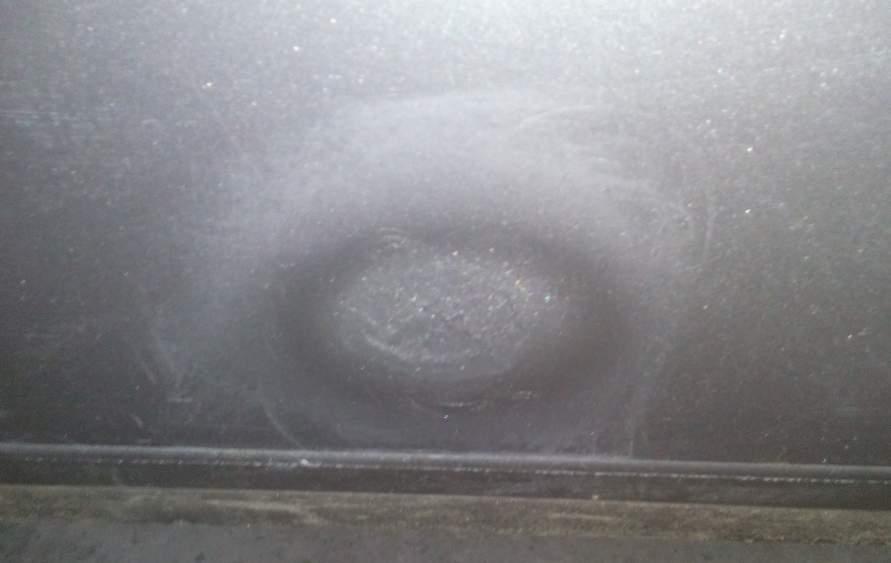
При помощи полировочной машинки и пасты 1 и 2 номер окончательно убираем переход. Окончательно получится примерно вот так:
Как вы понимаете, на фото, нижняя часть двери и на машине этот дефект, практически незаметен:
К сожалению, в этой статье видео не будет, так как этот ремонт не снимался…. Но в целом фото позволяют понять последовательность действий.
Вот небольшое видео работы с полировочной машинкой:
Если у вас остались вопросы про то, как убрать жучки с кузова автомобиля своими руками, или если вы хотите дополнить статью, пишите в комментарии.
С уважением, администратор http://life-with-cars.ru
Ржавчина является наиболее частой и распространенной проблемой, с которой автомобилистам приходится сталкиваться при обслуживании автомобиля. Повреждение кузова коррозией очень трудно остановить. Для этого необходимо своевременно выполнить ряд защитных мер обеспечивающих сохранность кузова, чем в дальнейшем устранять допущенные повреждения.
Наиболее часто причиной возникновения повреждения кузова, служит мелкая щебенка, вылетающая из-под колес встречного или попутного транспорта, а также химические реактивы, которые используются в целях снижения обледенения проезжей части и тротуаров.
Автомобилисты часто задают вопрос: «Как удалить жучки с кузова автомобиля?» попробуем кратко ответить на этот вопрос.
Процесс удаления коррозии с кузова автомобиля состоит из нескольких этапов:
- мойки автомобиля, с удалением грязи и пыли на кузове автомобиля;
- сушки кузова;
- исследования кузова на наличие участков поврежденных ржавчиной, сколов и трещин краски с обязательным осмотром арок колес, порогов, днища автомобиля и тщательного обследования пола внутри салона автомобиля;
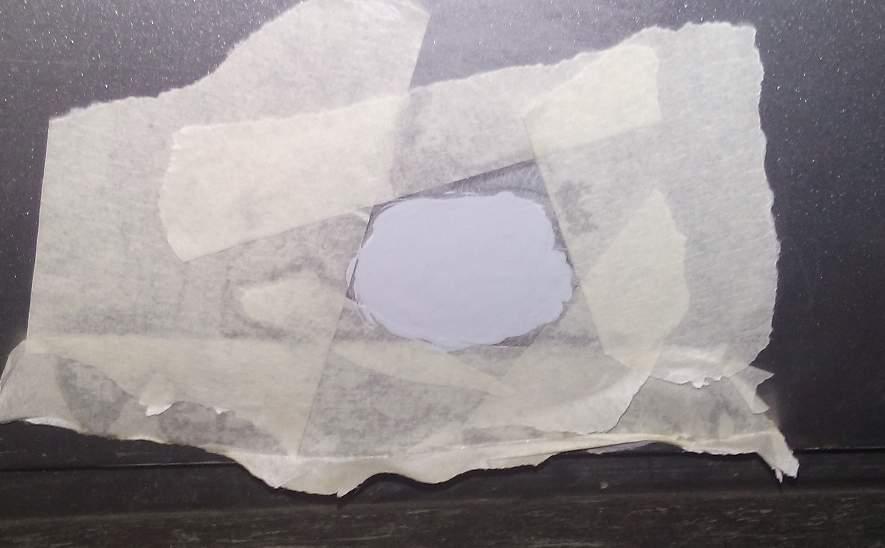
- места, поврежденные жучками необходимо выделить с помощью клейкой ленты;
- подготовки кузова к работам по удалению ржавчины;
- проведения работ по удалению коррозии;
- дополнительной обработки зачищенных участков от ржавчины;
- нанесения шпаклевки с обработкой шкуркой до создания ровной поверхности;
- окраски подготовленных участков.
Проведение работ по удалению ржавчины
При длительной эксплуатации автомобиля, особенно при влажном климате (да и не только), на кузове образуются повреждения «жучки». Как убрать «жучки» с кузова автомобиля?
Для обработки металла с целью удаления ржавчины используют два основных метода:
- механический;
- химический.
Вид ремонта связанный с уборкой жучков с авто своими руками, как правило осуществляется в личном гараже с использованием набора инструментов для обслуживания автомобиля.
Механический метод
Как убрать жучки на кузове? Для этого места, поврежденные ржавчиной, обычно, обрабатывают шкуркой или металлической щеткой. Зачистка поврежденного места в начальной стадии осуществляется крупнозернистой шкуркой, с переходом в дальнейшем процессе обработки на мелкозернистую шкурку.
Обработка шкуркой может проводится «сухим» или «мокрым» способом. При «мокром» способе поверхность металла увлажняется керосином или уайт-спиртом.
Ржавчину можно удалять с кузова автомобиля и с помощью шлифовальной машины. Для этого подходит наборный шлиф-диск, при помощи которого убирается слой ржавчины на глубину 6-8 мм и окончательно зачищается место повреждения до получения гладкой поверхности без следов ржавчины, мелкозернистой шлифовальной шкуркой.
Очень хороший результат дает применение для очистки пескоструйной машины, которая сочетает высокую эффективность и позволяет предотвратить повреждение кузова. Удаление ржавчины с помощью пескоструйной машины, осуществляется за счет очистки металла струей воздуха с частицами песка. Подобный способ позволяет провести качественную очистку мест повреждений от жучков.
Химический метод
При химическом методе удаления коррозии с кузова автомобиля, используются различные реагенты-преобразователи ржавчины. Они способны предотвратить распространение коррозии в местах повреждения. Компании, выпускающие автокосметику, предлагают широкий ассортимент различных средств.
1. Среди автолюбителей широкую известность приобрел состав «Нейтрализатор ржавчины ВСН-1», после обработки которым, ржавчина преобразуется в серое вещество, которое легко удаляется ветошью.
2. Наиболее часто применяется средство для удаления ржавчины с кузова автомобиля — ортофосфорная кислота, которая входит в состав многих препаратов преобразования ржавчины.
3. В последнее время автомобилисты используют спрей цинковый, который образует на поврежденном месте защитную пленку из частиц цинка, тем самым препятствуя оживлению металла.
В розничных магазинах предлагается специальных комплект «Цинкор-Авто» состоящий из раствора для проведения обезжиривания и удаления ржавчины, а также раствора для образования покрытия металла защитной пленкой из частиц цинка.
При использовании набора место повреждения ржавчиной обрабатывается преобразователем ржавчины, а затем с помощью электродов подключается к аккумулятору и на поверхности металла образуются частицы цинка. В процессе электрохимической реакции частицы цинка покрывают металл, образуя защитную пленку.
Шпаклевка и окраска кузова
На обрабатываемую поверхность наносится слой шпаклевки, который с помощью влагостойкой шкурки обрабатывается, выравнивается до ровной поверхности. Шпаклевка может наносится в несколько слоев, и каждый раз выравнивается наждачной бумагой до придания ей ровной поверхности. И последний шаг перед покраской — это нанесение грунтовки.
Для окраски кузова подбирается цвет краски соответствующий основной окраске кузова. Подобрать цвет кузова лучше в автомастерской по номеру краски в паспорте автомобиля. Окраска проводится с помощью краскораспылителя, не менее чем в три слоя.
Правильно подобранная и проведенная обработка кузова автомобиля, соблюдение порядка осуществления всех технологических процессов поможет автолюбителям продлить эксплуатацию транспортного средства с сохранением финансов и времени.
Если статья была Вам полезна, можете поделиться материалом в социальных сетях:
Все автовладельцы регулярно проводят ТО своих машин, особенно тех, чей срок эксплуатации превысил 10 лет. Но внешние проявления изношенности часто остаются незамеченными. И зря! Даже небольшие «крапинки» — инородные частицы, попавшие в краску автомобиля, — могут со временем привести к катастрофическим последствиям. Их можно предотвратить, если вовремя принять профилактические меры. О том, что такое «жучки» на машине и как от них избавиться, вы сможете прочесть в этой статье.
Откуда на машинах заводятся «жучки»
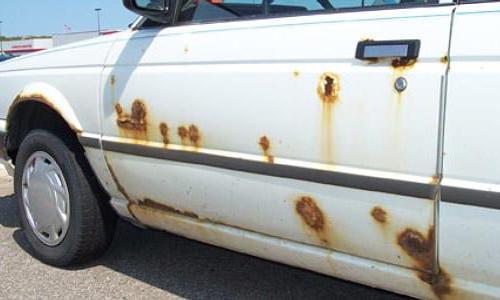
Всем нам с детства известен главный враг железа – ржавчина. Она разъедает металл, мало-помалу делая ваш личный транспорт непригодным для передвижения. Появляется на кузове ржавчина из-за разрушения лакокрасочного слоя автомобиля, который наносится защитной пленкой при производстве. Мелкие царапины, повреждения открывают доступ кислороду и воздуху к железу, что создает идеальные условия для появления «жучков» на машине. Скорость распространения этой заразы зависит от окружающей среды: влажный климат с частыми осадками ускоряет процесс в несколько раз. В зимний период ситуация усугубляется появлением на дорогах химических реагентов, которые действуют, словно соль на рану, еще глубже разъедая кузов машины. Что же делать, если на машине появилась ржавчина?
Ржавчина – проклятие автомобилистов
Вряд ли найдется владелец такого автомобиля старше 10 лет, которого бы миновала «ржавая болезнь». Некоторые считают, что раньше железо было лучше, не то что сейчас. Другие же утверждают, что все дело в правильном уходе и профилактике. Как бы то ни было, довольно часто на дорогах можно встретить машины, покрытые оранжевыми пятнышками.
Ржавчина может быть локализована в одном месте (например, внизу порогов машины) или же распространяться по всему кузову. Чаще всего оказываются поражены участки, наиболее плотно контактирующие с грязью и мелкими камнями: днище, пороги и низ дверей машин. Усугубить ситуацию могут и механические воздействия: заезды на бордюр, аварии, царапины и повреждения, умышленно или случайно нанесенные людьми. Дело в том, что даже от небольшого «голого» участка железа ржавчина очень быстро может распространиться по всему кузову. При этом «жучки» на крыше автомобиля чаще всего разъедают железо «вглубь», из-за чего справиться с дефектом становится еще сложнее. Как же можно избавиться от ржавчины?
Как убрать ржавчину на машине
Существует несколько способов избавления от ржавчины на кузове – механический и химический. Независимо от выбранного метода, процесс очистки машины делится на несколько этапов:
- Очистка кузова – один из самых главных этапов работы. От его эффективности будет зависеть многое, ведь только он способен показать, насколько запущен процесс. Часто бывает так, что до мойки машина выглядит вполне прилично, а после становится похожа на съеденный мышами сыр. Ничего странного в этом нет, ведь грязь и сгнившее железо часто закрывают поврежденные участки, не давая как следует оценить масштабы бедствия. Поэтому при подготовке к мытью машины нужно быть наиболее внимательным. Использовать стоит только специальный автомобильный шампунь, который бережно удалит грязь и химические соединения с кузова.
- Зачистка поврежденных участков кузова может проводиться с помощью различных методов. Ее главная цель – убрать ржавчину с деталей машины. Здесь даже лучше немного переусердствовать, зачистив большую площадь. Если вы недобросовестно выполните этот этап работы, то все усилия пойдут насмарку.
- Удаление остатков ржавчины при помощи химического соединения.
- Нанесение грунтовки, во время которого на появившуюся впадину наносят покрытие, полностью выравнивающее рельеф кузова. Грунтовка, конечно же, не заменяет цельного листа железа, но является значительно лучшей альтернативой, чем ржавчина.
- Заключительным этапом является покраска ремонтируемого участка машины. Здесь очень важно точно попасть в цвет. Если все сделать как нужно, то следов работы заметно не будет, а ваша машина станет как новая.
Механический способ
Как мы выяснили, удалить ржавчину с кузова автомобиля можно несколькими способами, один из которых – механический. Проводится он с помощью пескоструйной машины, шлифовального аппарата, специальных металлических щеток или наждачки. Этот способ выбирают в тех случаях, когда повреждения уже запущены и поверхностными манипуляциями не обойтись. Для удаления «жучков» на металлических деталях автомобиля необходимо зачистить повреждения до полного исчезновения следов коррозии. Лучше всего, если деталь будет блестеть. Наиболее удобен для применения пескоструйный аппарат, который подает струю песка под большим давлением. Он позволяет быстро и аккуратно отполировать металл до блеска, придав ему первоначальный вид.
Химический способ
Еще одни способ, с помощью которого можно очистить кузов от ржавчины, относится к химическим методам воздействия. Специальные реагенты, которые следуют наносить на поврежденные участки автомобиля, способны значительно сократить время и силы на проведение процедуры. Но, к сожалению, подойдут они не для всех: глубина коррозии должна быть не более 1 мм. Как правило, химические реагенты — это агрессивные соединения, которые вступают во взаимодействие с ржавчиной и разрушают ее. Поэтому во время их использования очень важно соблюдать технику безопасности:
- Не использовать реагенты в закрытом пространстве.
- Защищать органы дыхания с помощью специальных масок.
- Не допускать попадания в глаза или рот.
- Использовать перчатки.
У каждого из методов есть свои плюсы и минусы. Но используют их обычно не по отдельности, а вместе. Первый этап механического очищения помогает как следует обработать поврежденные ржавчиной области, а химические реактивы завершают работу, добираясь в труднодоступные места. Совместив два этих метода, каждый может быстро и просто очистить свой автомобиль от ржавчины.
Антикоррозийное покрытие автомобиля
Что такое антикоррозийное покрытие? Это специальное покрытие, которые способно на время предотвратить появление ржавчины на автомобиле. Специалисты советуют проводить антикоррозийную обработку всем без исключения хотя бы раз в три года. Не очень хорошее состояние наших дорог и влажный климат являются причинами многочисленных дефектов кузова, которые неминуемо ведут к дальнейшим поломкам. Во время антикоррозийной обработки машину обрабатывают специальным раствором, который выбирают в соответствии с типом ржавчины и условиями эксплуатации. На данный момент различают следующие виды покрытия:
- Прозрачный жидкий пластик – это состав, предохраняющий кузов от механических повреждений и придающий косметический эффект глянца. Такой состав вряд ли защитит машину надолго, поэтому его стоит рассматривать исключительно как профилактическую процедуру.
- Битумная мастика изготавливается на основе синтетических и битумных смол, которые ложатся тонкой пленкой на кузов автомобиля и защищают его от ржавчины и химических реагентов.
- Антикор на основе каучука – один из самых долговечных способов защиты от повреждений. Он эффективно защищает кузов от мелких царапин и ржавчины. На заводах по производству автомобилей чаще всего наносится именно этот состав.
Сделать антикоррозийное покрытие для защиты кузова автомобиля можно и самому, потратив некоторое время и силы на подбор необходимого средства. Главное в самостоятельной покраске — тщательно обработать все закоулки и труднодоступные места, куда вы обычно не заглядываете. При своевременной и регулярной обработке автомобиля ржавчина на нем точно не появится.
Как убрать ржавчину своими руками
Как заделать «жучки» на машине своими руками? Убрать ненавистную ржавчину можно и самому, используя для этого механический или химический способ очистки. По последовательности самостоятельный способ ничем не отличается от салонного. Вам понадобится заранее подготовленное оборудование, время и немного терпения. При должной подготовке процесс достаточно прост и не требует каких-то определенных навыков или умений.
Отзывы о самых популярных методах и средствах
Качество итогового результат напрямую зависит от того, какие средства вы будете использовать. Ниже приведен список нескольких препаратов для борьбы с ржавчиной своими силами:
- «Цинкарь» — эффективное, но очень токсичное для человека соединение. Представляет собой соединение цинка и марганца. Обладает приемлемой стоимостью и эффективностью. Обработку стоит проводить несколько раз — до того момента, как следы ржавчины полностью исчезнут.
- «Уничтожитель ржавчины B-52» — дешевое и хорошее отечественное средство. Единственным минусом является его форма – гель плохо держится на наклонных поверхностях, стекая вниз.
Профилактика
Избежать проблем с повреждением кузова ржавчиной можно, если вовремя выполнять простые действия:
- Регулярно мыть автомобиль. Казалось бы, что может сделать обычная мойка против ржавчины? Но водой смываются химические реагенты, которые разрушают металл через дыры в лакокрасочном покрытии.
- Регулярный осмотр после мойки позволит вовремя заметить и предотвратить появление ржавчины.
- Чтобы уберечь автомобиль от грязи и камней, можно установить подкрылки и брызговики. Они значительно улучшат сохранность внешнего вида авто.
- Регулярное антикоррозийное покрытие автомобиля (особенно днища). Как правило, на незаметную часть машины — днище — обращают внимание реже всего, а зря. Именно с него зачастую начинается гниение автомобиля.
- Антигравийная пленка убережет покрытие от появления царапин, сколов и трещин.
Применяя эти нехитрые меры, можно надолго сохранить свой автомобиль в новом состоянии.
Советы мастеров
В Сети можно встретить множество советов опытных автомобилистов о том, как правильно бороться с ржавчиной. Главное в самостоятельной очистке кузова от коррозии – сделать все тщательно, не пропуская пораженные участки, желательно несколько раз. После того как ржавчина будет устранена с помощью химического и механического метода, получившееся отверстие обязательно нужно зашпаклевать с помощью грунтовки. Если вы попробуете покрасить деталь без нее, краска вскоре просто отойдет.
Итоги
Коррозия кузова не образуется за один час. Она развивается поэтапно, день за днем разрушая железный остов автомобиля. Если вовремя принять меры, предотвратить дорогостоящий ремонт можно без особых средств и усилий — достаточно лишь регулярно очищать кузов от ржавчины и проводить антикоррозийную обработку. Тогда ваша машина прослужит вам еще долгие годы и будет выглядеть, как новенькая.
Насекомые доставляют массу беспокойств водителям. Во время поездок по междугородним трассам жуки и бабочки разбиваются о передние части машины, засоряют радиатор, налипают пятнами на бампере, капоте, на лобовом стекле и засыхают на теплом ветру. Причем эти пятна превращаются в плотную корку, которую приходится сильно тереть, царапая и повреждая лакокрасочное покрытие кузова. Не всякая бесконтактная мойка способна взять эти пятна, поэтому приходится использовать специальные химические средства для очистки. Баллончики и флаконы с дорогими препаратами помогают справиться с пятнами, однако они очень дороги и быстро кончаются. А после следующей поездки машина вновь покрывается точками и разводами от насекомых. Есть ли какие-то более эффективные и дешевые способы борьбы с пятнами от насекомых? Смотрим лайфхаки на автомобильных форумах.
Горячий воск
Автомобилист Игорь из Сыктывкара с 35-летним стажем вождения советует заранее готовить машину к встрече с насекомыми. Перед поездками на «дальняк» транспортное средство можно покрыть горячим воском, который придает блеск машине и защищает от появления биологических разводов. Воск предварительно необходимо развести в горячей воде. Пропорция и очередность процесса нанесения указаны на этикетке. Все необходимо делать по инструкции, от чего зависит успех дела. Затем кузов полируют. Если в поездке попадаются насекомые, то они отмывается намного лучше, чем на незащищенном кузове. Разводы уходят даже после протирки мокрой тряпкой.
Кухонный Fairy
Сергей из Вологды с 15-летним стажем вождения советует не тратиться на дорогие химические препараты из магазина автохимии, а пользоваться альтернативными домашними средствами, которые справляются с возложенными задачами не хуже. Для очистки машины и избавления от пятен насекомых можно использовать обычный Fairy для мойки посуды. Одну бутылку можно зарядить через домашний «керхер» и использовать раствор для помывки кузова. После такой процедуры пятна исчезают.
«Мистер Мускул»
Матвей из подмосковного Подольска считает, что для избавления от насекомых лучше всего помогает бытовое средство для мытья полов «Мистер Мускул», но обязательно зеленого цвета. Для верности необходимо приобрести две бутылки. Одна используется для разведения в ведре с теплой водой. С помощью губки и тряпки необходимо тщательно помыть кузов, а также лобовое стекло. А вторую бутылку можно для профилактики по чуть-чуть выливать в бачок омывателя. Тогда бороться с пятнами можно будет штатными щетками прямо во время движения машины. Главное не переусердствовать с консистенцией. Если залить в резервуар слишком много «Мистер Мускул», то вода превратится в пену и распылитель не сможет эффективно работать.
Мокрое покрывало
Александр из Москвы с 15-летним опытом вождения подсказывает оригинальный способ борьбы с пятнами от насекомых. Он советует обильно намочить матерчатое покрывало из натуральной ткани в водном растворе Fairy или «Мистер Мускул» и водрузить его на капот и нос машины. Сверху можно еще обильно полить мыльной водой, чтобы хорошо смочить остатки насекомых. Мокрое покрывало должно лежать на машине всю ночь, после чего можно приниматься за уборку. За несколько часов пятна отмокают, средство разъедает их и проникает вглубь биологической корки. Растворившиеся следы насекомых хорошо удаляются простой мягкой тряпкой.
Уайт-спирит
Если попадаются застарелые засохшие пятна, которые не поддаются очистке с помощью кухонных средств, то Юрий из Пензы предлагает воспользоваться бытовым растворителем Уайт-спирит. Это недорогое средство давно применяют в лакокрасочной промышленности для разбавления масляных красок, алкидных эмалей и приготовления лаков, а также мастик. Уайт-спирит по составу похож на керосин и иногда даже может заменять его в качестве топлива в горелках и старых лампах. Он хорошо растворяет не только биологические пятна, но и следы нефтяных фракций, растительные масла и жиры. Правда долго держать его на лако-красочном покрытии нельзя. После смачивания загрязненных участков его необходимо срочно смыть водой.
90000 How To Remove Bed Bugs / Ants / Mites / Insects From Laptop Computer 90001 90002 Are you experiencing a bug or insect crawling out of the keyboard, or on the monitor or from the speaker / ventilator holes? 90003 90002 If yes, you might be bored and desperate enough to get rid of them permanently so that they never could come back later. 90003 90002 Although these bugs are not harmful, they can create a lot of problems in your keyboard. 90003 90002 They can make some letters typing hard, sometimes you will not be able to type anything with some keys or some keys such as Num-lock might not work as it should do.These issues happen if you do not use your laptop or keyboard (desktop) or store it improperly for a long time. 90003 90002 All these bugs / insects are not the same in size or color. Sometimes, they may be a tiny sized or common bedbug. In most cases, you might not even recognize them clearly. In this post, I am going to discuss how to identify the bugs and remove them forever. 90003 90002 90013 How Laptop Bugs Look Like: 90014 90003 90002 In most case, these bugs are tiny / microscopic-sized and very hard to see.Sometimes, you can only notice them on the monitor screen with a white background. They may look «salt», «sugar» or little dots that move! Sometimes they are about 1 / 8th of the ‘full stop’ on a keyboard or very skinny and small just like the icon on F2 button. 90003 90002 They can be on the monitor screen, into or out of the keyboard. They are white or yellow in color just like sand. you can easily put 10-15 of them on a penny. They are extremely small and move fast. 90003 90002 They have long «hairs» from tiny round bodies.If you have a magnifying glass, you can check them out. You can see some climbing down or crawling the holes on the speakers or heat vents. 90003 90002 However, in some cases, you can see bedbugs such as nymphal bedbug. It is large and you can easily detect it. The baby bedbugs are 2mm long. It may be a hitchhiker and comes out of keyboard for food. 90003 90002 90025 what are they called 90014 90003 90002 These bugs are too small to be recognized. They may be mites such as bird mites, dust mites, aphids or spider mites.It is also possible that they may be booklice, bed bugs or just ants. 90003 90002 They are harmless but very annoying. Sometimes, it is hard to get out of booklice once they find a foothold. Aphids or spider mites come from ferns if you own any in your home. Bedbugs can live in desktop computers and laptops. Ants mostly come to LCD and keyboard. 90003 90002 If they are too small, you might not recognize them and the good news is that you do not need to recognize them in order to remove them. However, if you are desperate to identify them, put some double-sided tape or sticky tape down on the keyboard to trap them.Then, take it to an expert entomologist for identification and removal. 90003 90002 90035 where they come from 90014 90003 90002 Needless to say, it is not a nice experience to see a centipede crawling on the wall or on your laptop. One of the main reasons why bugs love your laptop is a favorable environment. 90003 90002 These bugs can come from different places. Among them, the most common sources are as below. 90003 90002 1) Bugs like humid area. if the place you live in has high humidity, you can find them nearby.90003 90002 2) nest with babies (for example, finches) 90003 90002 3) from plants such as fern spores 90003 90002 4) damp surfaces feed tiny white or tan mites 90003 90002 5) moisture problem or water leak causes mold growth. 90003 90002 6) If your bed have bedbugs or any other bugs and you put it on your bed at one point 90003 90002 7) if there is any giant tree close to your home or apartment. Alternatively, any tree limbs or branches lying down your roof or wall. They can also creep through the cracks in the house.90003 90002 8) if you live on a ground floor and you put the laptop on a table attached to a wall. 90003 90002 90059 How to remove them 90014 90003 90002 There are many to remove bugs temporarily or permanently. Some ways require nothing while some require a few tools. Some of these items can be brought from a shop while some you will find in your home. Some method may be a bit risky for noobs while some are super easy to implement. In short, it just depends on what will make you feel secure.90003 90002 1) Buy a can of compressed air. Open the back cover and blast with it. 90003 90002 2) Use a vacuum cleaner. Use the finest nozzle or crevice tool on a vacuum cleaner to take them out. Some of them will hide under the keys.As the vacuum removes all crumbs or dust, they will have nothing to eat. Eventually, they will be forced to leave it. 90003 90002 3) take off keys from the keyboard. Remove the hair and dust. You can blow under the keys. I will discuss it later. 90003 90002 90003 90002 4) disassemble or take apart the computer and clean it out thoroughly if possible.You can watch a youtube video to know how to disamble.However, it is not recommended for average laptop or desktop computer user. 90003 90002 5) If you are sure that bugs are into your laptop, you can run furmark and Prime95 to get your temps into the 90-100C range. The heat will make them feel uncomfortable and force to leave the laptop. 90003 90002 6) For ants, there is an easier way to remove them. Just lure them out with ant killing stuff. If you do not want to use killing stuff, put an open jar of honey next to the laptop to take them out.It will attract them to come out, eat and die outside.For other bugs, put something that attracts them and kills them. Doing it outside of your home will make it easy for debris cleaning. 90003 90002 7) Put the laptop in a box or container with some insecticide pads. Just buy a housefly killer that forces the bugs to go away with smell or being in a nearby place. They may look like a fabric pad or card. 90003 90002 8) Using packtite 90003 90002 First, Remove the battery. Wrap the laptop in a backpack or in a box for heating up slowly.keep the backpack / box slightly open. Then keep it inside packtite. Within 2 hours, the temperature will reach around 140 degrees. At this stage, all bugs will die. Doing anything extreme will not only kill bugs but also your laptop too. You can use the clothes dryer on a dryer rack too. 90003 90002 Before applying this method, check how much heat your laptop model can tolerate. You can get the information from the user manual or their official website. if not, contact customer support. 90003 90002 Note that, this is not recommended by packtite for electronic devices.Heat can damage electronic parts and explode rechargeable batteries. Some laptops have a built-in battery (not detachable). I highly recommend not to apply this method if your laptop has built-in (not detachable) battery. The laptop base is designed to tolerate heat, so heat can not do much hard here.But it can damage the LCD (laptop screen) or hard drive.It is not easy to remove the LCD from the base. 90003 90002 Some people say they put Macbook Pro (MBP) unibody in packtite at 140 degrees for 1 hour and it had no issues.90003 90002 9) If you have a bit of tech knowledge, you can unscrew the laptop to perform a visual inspection and cleaning. However, it is not recommended for average laptop or desktop computer user. There are many tiny parts which can easily get lost. Some parts are attached with glue instead of screw.In short, it may be easy to disassemble a laptop after watching a few youtube videos, but re-assemble would be very hard to do. 90003 90002 10) if you have a technician friend, you can ask him to disassemble or take apart the computer and clean it out thoroughly.90003 90002 11) If your home is full of bugs, you can hire professionals such as Terminix, they do «cold treatment» on electronics. 90003 90002 12) you can use a legal poison like «Nuvan Prostrips» for removing bedbugs from a laptop. The only disadvantage is that it takes 2-3 weeks and you can not use your laptop in this period of time. 90003 90002 13) Do nothing. yes! you heard it right. just turn on the laptop and leave it on for 24-48 hours. Start defragmenting the hard drive, run animation or any tasks that use CPU and GPU.it will keep the processor busy and make the internal temperature high.The heat will force the bugs to leave the laptop and the air moving would kill any eggs or nymphs. Do not worry about the heat. Most laptop or desktop has a «sleep» function. if the internal temperature becomes too high, the system will turn off automatically before any damage. 90003 90002 This method also works best if you see the bugs living in or coming from the laptop ventilator. This is where the CPU and fan has. The heat and airflow either force them to come out from the compartment or fry them.90003 90002 However, you need to open the back cover for cleaning the dead bugs if they are fried inside. 90003 90002 The bad thing is that there is plenty of space inside the laptop or CPU which does not get heated with the processor. The bugs can move and hide there instead of coming out. Secondly, the lower-end processor may not run for days without any break. 90003 90002 14) If you have a hairdryer, open the back cover and disturb the bugs to leave. 90003 90002 15) I do not recommend freezing as a safe way to remove bugs for the laptop but if you think it is essential, you can do it.Make sure there is no moisture inside electronics. it can cause disaster when you plug it back into an electric outlet. 90003 90002 a) remove the battery 90003 90002 b) Seal the laptop into a plastic bag 90003 90002 c) if possible, put a bag of desiccant with the laptop. Alternatively, put half a cup of uncooked rice in the oven, bake for an hour at 150 degrees, and wrap that in a paper towel, this will do equally well as a desiccant. 90003 90002 d) put the bag in freezer 90003 90002 e) keep the bag sealed for 3-4 hours until it has thawed to room temp to absorb more moisture 90003 90002 f) dry it for 4-5 days before turning on 90003 90002 16 ) You can use air washing machine to clean the Laptop or computer.Some retail shop uses this method for servicing. First, remove the back cover of your laptop and put the laptop under the hood of the air washing machine. High-Pressure air will dislodge and remove bugs and dust from multiple directions. If you want to use this method, run the laptop for a few hours to raise the internal temperature. Set Looping animation video in a player. 90003 90002 17) You can use Chamber fumigation with Vikane gas. It is a very effective approach. It is widely used for termites, imported goods & farming.90003 90002 17.1) Remove the battery if possible 90003 90002 17.2) cover the outer surfaces such as LCD, keyboard and palm rest of the Laptop or MBP with clear wrap (Saran Wrap). 90003 90002 17.3) Place the laptop into a plastic garbage bag 90003 90002 17.4) Spray into the bag but not directly on the laptop. 90003 90002 17.5) Seal the bag and keep it locked for 24-48 hours. 90003 90002 17.6) After that, open the back cover and blow the dead bugs with compressed Air 90003 90002 18) For bedbugs or bigger bug, you can cross poison when they come out for food.However, This will not work for tiny bugs who eat dust. 90003 90002 19) You can use InstantFreeze which uses Co2 gas for cleaning. You can use it in computers, server rooms, and data centers. 90003 90002 20) You can use the keyboard aerosol 90003 90002 21) Get a bag with seal or zip. Buy an aerosol or bug spray and Spray the inside of the bag. Do not spray on the laptop directly.put the laptop in the bag and keep it for a few hours. Make sure you clean the body with a rag before using the laptop.90003 90002 23) if you do not want to use aerosol or bug spray, just keep the laptop in an airtight bag for a few days. They will suffocate and die. later, use a can of air duster to remove them. This is not for tiny bugs which eat dust. The cleaning process for a long time. 90003 90002 24) For aphids, whitefly and other flying insects, you can use yellow sticky cards. Put the laptops into a ziplock bag with some cards. The bugs will be killed fast without chemical or pesticides. There is no risk for animal nervous systems.90003 90002 27) To remove bugs from internal components, you can use some rubbing alcohol and cotton / thin cloth to wipe the bad spots. Rubbing Alcohol will evaporate quickly leaving no residue or trace. 90003 90002 28) Doing something wrong can damage your laptop or computer and can cause more harm than the bugs. Before selecting and applying any method, make sure you are comfortable with it and it has no risk issue for you. If you do not feel safe, just take it to a shop for servicing. For a few bucks, you can get rid of the bugs without any issues of your laptop.90003 90002 29) It is very hard to remove Bugs inside the LCD (laptop screen) or Macbook. You may need to take it to repair shop or replace it. LCD replacement is costly. It may cost $ 500 for Macbook air LCD screen replacement. Consider replacement as the last way. 90003 90002 30) If your desktop keyboard is highly infested with bugs and you can not remove the bugs by yourself, just buy a new one. Taking it to a computer repair shop will cost more than a replacement keyboard. 90003 90002 90159 How to remove bugs from desktop computer 90014 90003 90002 Compared to the laptop, it is easy to remove the bugs from the desktop computer.90003 90164 90165 Just open the case. 90166 90165 Blow bug faces out with a blower. 90166 90165 Bug faces can cause earlier wear for internal parts. 90166 90165 Clear them all. 90166 90165 Then, clear the fan filters. There maybe 2-3 fan filters in a CPU. 90166 90175 90002 If you do not own an expensive keyword, replacing one is a good option. You can get a decent wired keyboard under $ 10. 90003 90002 90179 how to remove bugs from tower computer 90014 90003 90002 Removing bugs from tower computer is the most difficult process among all other devices.90003 90164 90165 open one side of the case 90166 90165 Perform a visual inspection with care. 90166 90165 vacuum it properly or use a hairdryer to force the bugs to go away. 90166 90175 90002 Remember that, all cases are not the same. Therefore, you may need to check first how to open your tower computer first. You may need to remove Phillips head screws and slide the case or remove the two thumbwheel screws from side panel or just flip latches. 90003 90002 90195 laptop bug treatment 90014 90003 90002 Experts advise that it’s rarely necessary to treat computers.Unless your laptop or computer is highly infested with bugs, you do not need bug treatments at all. There is a risk of collateral damage. There are 3 types of bug treatments for laptop or desktop computer. 90003 90002 90201 a) Freezing: 90202 You can freeze bugs with carbon dioxide snow (dry ice) .it can kill bed bugs (including their eggs and larvae). it is dry (just like form snow) and can penetrate into keyboards and deeper place. The method is safe. there’s no damage to electronics. 90003 90002 90201 b) Steam: 90202 Steam can kill insects but never do it on Laptop.It is just hot water which can cause bigger problems for the laptop than bugs later. 90003 90002 90201 c) Thermal Dry Heat: 90202 it increases the room temperatures between 113 and 140 F. to kill bugs. It is risky for electronics. 90003 90002 If you see any surface of your laptop becomes moldy and shows signs of mold mite activity, the best treatment is heat or cold. 90003 90002 90215 what you should not do 90014 90003 90002 1) Do not do any steaming treatment on the laptop. 90003 90002 2) Any kind of heat treatment could damage the LCD (laptop screen), hard drive or micro switches under the keys on the keyboard.90003 90002 3) Do not use liquid / powder pesticide, sticky sprays or flea and tick powder on the laptop. It can harm your health when you touch the surface.It can also clog the components in your laptop.It can gum up the keys.The same goes for bug spray. 90003 90002 4) Do not use roach bait traps. Using it will increase the number of dead bugs inside your laptop or MBP. 90003 90002 5) if your home or apartment is infested with bedbugs, do not travel with laptop or luggage. 90003 90002 6) Do not spray anything directly on the laptop.90003 90002 7) Some methods of bug removal may be dangerous for you. If you do not want to use freezing temps, heat, or liquids, try the methods are made as safe or take it to a computer repair shop for servicing. They will open and clean it. But I recommend you ask first them how they will service the laptop. Some shops put a small amount of an insecticide substance inside the case which is not a good idea for health.You should ask them blast air through the workings of your laptop with their compressor.90003 90002 90233 Why Bugs come to laptop / computer 90014 90003 90002 1) If you eat on your laptop, your food grain or crumbs attract them. In most cases, the little creatures literally live on your keyboard. 90003 90002 2) if you do not use the laptop or open it for a long time. 90003 90002 3) research shows that some ant species are capable of using the Earth’s magnetic field for searching food or nest sites. The electrical components in the laptop may attract them. 90003 90002 4) If it is cold outside, some bugs such as juvenile bedbug come inside the laptop for getting warmth from the processor heat.However, they will come out as soon as you turn the laptop on as it will increase the temperature higher. 90003 90002 5) The average keyboard has more dangerous things on it than your toilet bowl. If your laptop or computer is used by multiple people, there is a chance that some may run it with a dirty hand. Sometimes, kids come from the toilet without washing hand and start running computer. 90003 90002 6) the bugs can enter to your laptop via a speaker, heat vent or some other holes. In tower computer, they can easily come through the bottom vents.90003 90002 7) For MBP (mac book pro), the bugs can enter through heat vent located at the hinge. 90003 90002 8) Some bugs look like little gnats that fly through your screen at night. The light / brightness on the screen attracts them from surroundings. Just change the background color to something black or dark. 90003 90002 90013 How to stop them coming back 90014 90003 90002 Even though there are countless ways to swat these bugs but no way can guarantee you that they are gone forever. Even if they leave now, they can come back in a few days again.Since they are not so dangerous, many people give up swatting them after a few trials and let them be. 90003 90002 Who invites bugs to a laptop? no one. 90003 90002 but even after removing them, they can come back. 90003 90002 This is bad in terms of health, laptop durability, and warranty. 90003 90002 A bug infestation inside your laptop or MacBook may void any warranty. If you need to send it to store for repair within the warranty period, they can revoke the warranty instead of repairing it.90003 90002 1) keep an eye on the garden plants. Check and clean it with regular interval. 90003 90002 2) if you have a nest with or without babies in your garden, check for bugs here. 90003 90002 3) Clear your home and surroundings with anti-bug stuff such as bug bombs, bug spray, and Borax. Make sure you take a filter mask before starting the cleaning process. 90003 90002 4) put a thin foam screen over your laptop or computer vents. Make sure that it does not stop air flowing or heat exchange process.Just ensure that bugs can not pass through it. This is not good for cooling. So, consider it only if your home is full of bugs and the bugs can enter anytime. 90003 90002 5) moisture promotes mold growth and mites live in mold. Do not let your laptop keep in a dark or congested environment for a long time. 90003 90002 6) Stop eating near your laptop. If it is not possible, do not eat over the keyboard. Keep a distance between your mouth and laptop keyboard. 90003 90002 9) If you can not stop yourself eating on the keyboard, buy a wireless keyboard.Wrap it and make it air-tight. Then use it. This is obviously not the best thing to do. Consider it the last way until you change your habit. 90003 90002 7) Seal laptop in a ziplock bag or saran wrap until you need to use it again.Make sure before storing, you clean it with the congested vacuum. 90003 90002 8) Clear laptop regularly. Wipe down the keyboard with disinfectant wipes (spray version is not recommended) .If your laptop is used by kids or multiple users, this is a must. 90003 90002 9) If your home or laptop is in a situation where you can not stop bugs crawling to it, use a bug zapper near your laptop.The bugs can not resist the BLUE. Alternatively, you can hang flypaper or something else to trap them. 90003 90002 10) Sometimes, the light on your room can attract the flying bugs from outside. Use a low wattage or low heat emitting bulb. 90003 90002 11) If you have a desktop or tower computer, use fan filters to cover case fan. They will stop a lot of bugs from coming inside. Make sure you clean it at regular interval. Btw, do you know Mackbook (MBP) has a fine nylon mess under the speaker panel so bugs can not enter inside through speaker? 90003 90002 12) If your home is infested with bedbugs which are beyond your control, I suggest you call pest control.Because even if you are successful in removing them from your laptop or MacBook, they will come back very soon. 90003 90002 13) Environment or climate can play a big role.If the place you live has got humid, you will experience a sudden increase in the number of bugs. They will self-limit once the season has gone. Some mites increase from spring to summer due to humid transition. 90003 90002 90013 Important things: you should keep in mind 90014 90003 90002 I think freezing or heating is comparatively dangerous and you should not do it until you are sure that your laptop can work at that temperature.A mistake can be very expensive. 90003 90002 You can check the operating manual. For freezing, ensure the laptop is rated below zero. For heating, ensure the LCD can tolerate the heat. 90003 90002 90303 Are Laptop Bugs / Insects dangerous? 90014 90003 90002 These laptop or computer bugs or mites are mostly harmless for your laptop and health. Except annoying and making you uncomfortable, they can create a few real problems. 90003 90002 While in most cases, they can not stay longer inside your laptop due to the heat.But sometimes, the dead bodies may pile up and jam the cooler fans on CPU and GPU.Some bed bugs may be melted in un-used USB ports. 90003 90002 This will create overheating issues that can activate the auto sleep switch on motherboard and turn off the system automatically. If this stays a long time, it can damage the internal parts as well. For desktop and tower computer, there is a lot of room to hide from the high heat. So, they can make their home here. 90003 90002 In term of health risk, the tiny bugs do not bite or cause structural damage to human.But dust mites can cause a type of allergic reaction in some people. The bedbugs or bug in bigger size may bite you when you are in sleep beside your laptop. They do not just bite in seconds like mosquitoes; a feeding takes some time.This is not harmful but why likes to keep an irritating friend with themselves 24/7. 90003 90002 90315 could they live in Laptop or computer? 90014 90003 90002 These bugs / mites do not like plastic much. Most laptop inner part is made of plastic. On the other hand, most desktop and tower computer cases are made of metal.90003 90002 While running every laptop creates heat through CPU and GPU. The internal coolers take the heat out with airflow. This is another reason why the bugs come out when you start your laptop. They can not tolerate the heat and come out before getting fried inside.Due to the size, desktop and tower computer cases have more room to hide for the bugs. 90003 90002 There is very little chance that the bugs make home inside your laptop. They might use your laptop to hide and sleep when they do not find any other comfortable housing.90003 90002 however, if you find bedbugs in your laptop, you need to treat the bugs in your whole house. Sometimes, they can come your laptop from other places where you take it with you. 90003 90002 90013 Wrapping Up 90014 90003 90002 In most cases, you do not need to repeat the procedure multiple times but in some cases, you may need 2-3 cycle to remove bugs and eggs. I highly recommend clearing the laptop at a regular interval so that you can kill them in early stage before they become a mess.90003 90002 If you see laptop bugs, do not ignore it. Later, it can create a bigger problem in the house. You may feel hopeless at facing bedbug infestation. With proper method, you can get rid of them and say good-bye them forever. 90003.90000 Bug in Ear: Symptoms, Removal, Complications 90001 90002 You may have heard stories about bugs getting in ears. This is a rare occurrence. In most cases, a bug will enter your ear when you’re sleeping while outdoors, like when you’re camping. Otherwise, a bug may fly into your ear while you’re awake, typically while you’re working or running outside. 90003 90002 The insect may die while inside your ear. But it’s also possible that the bug remains alive and tries to burrow its way outside of your ear.This can be painful, irritating, and worrisome. 90003 90002 While a bug in your ear will typically be harmless, further complications can and do arise. Always remove the insect or have it removed as quickly as possible. 90003 90002 If the insect is still alive while in your ear, the buzzing and movement of the bug is oftentimes both loud and painful. Depending on what the insect does to your ear while inside, such as piercing or biting, you’ll most likely experience pain, inflammation, and irritation.90003 90002 The tissues of the ear canal and eardrum are innervated by cranial nerves. This means that injury or irritation to this area is incredibly disruptive. Additionally, there can be: 90003 90012 90013 redness 90014 90013 swelling 90014 90013 discharge from the ear, including blood or pus, that signals injury to the ear 90014 90019 90002 While adults can readily enough identify an insect with its buzzing and movements, it can be much more difficult for young children to determine the cause of pain in their ear.If you see young children rubbing or scratching one of their ears, this may be a sign of a bug inside the ear canal. 90003 90002 An important part of the removal process for a bug in your ear is to remain calm. Try removing the bug from the ear canal at home at first. Do not use a cotton swab or other probing object. It can push the insect farther into the ear and potentially damage the middle ear or eardrum. 90003 90002 It helps to gently pull the back of the ear toward the back of the head to straighten out the ear canal.Then, shaking your head — not hitting it — may dislodge the insect from the ear. 90003 90002 If the insect is still alive, you can pour vegetable oil or baby oil into the ear canal. This will usually kill the bug. If you suspect the bug is dead, you may be able to flush it out of the ear using warm water and a syringe. 90003 90002 However, if you or your child has a history of ear problems, it’s important to go to the doctor right away if you suspect there’s a bug in the ear. 90003 90002 Because insects can scratch and damage the eardrum, it’s also very important to seek out a doctor’s help immediately if you can not remove the insect yourself.90003 90002 The doctor — usually an ear, nose, and throat specialist (ENT) or someone working in the emergency room — will use something called an otoscope to peer within the ear and determine if it is indeed an insect. They may use modified tweezers or forceps to grab the insect and remove it from the ear. Alternatively, they may use gentle suction or flush the ear canal with warm water and a catheter. Children may need to be sedated during this process. 90003 90002 If oil was unsuccessful in killing the insect, doctors will typically use lidocaine, an anesthetic, to successfully kill the bug before flushing it out.It’s possible that your doctor will prescribe you antibiotics if there’s severe damage done to the ear canal. 90003 90002 The most common complication from an insect in the ear is a ruptured tympanic membrane, or ruptured eardrum. 90003 90002 If the bug bites or scratches the eardrum, it’s possible that this trauma to the ear affects the eardrum. If this happens, you’ll feel pain and typically see bloody discharge coming from the eardrum. You may also not be able to hear as well. Unfortunately, this can occur even if the doctor is able to remove the insect soon after it enters the ear.90003 90002 If the insect is not removed completely, it’s possible that an infection of the ear can occur as well. 90003.90000 How To Remove Gadolinium From Brain And Body Tissue — MyBioHack 90001 90002 Gd may be neurotoxic to the nervous system. R 90003 90002 For example, in a case study, Gd has shown to cause encephalopathy. R 90003 90002 In animal models, Gd has shown to cause myoclonus, ataxia, tremor, and corpus callosum damage and hemorrhage. R 90003 90002 Long-term oral administration of lanthanides has shown to affect learning and memory, swimming and walking abilities, and touch response behavior in rats.R 90003 90010 5. Activates The Immune System 90011 90002 Although rare, GBCAs can cause acute allergic reactions via non-IgE-mediated 90013 mast cell degranulation 90014 and complement activation. R 90003 90002 GBCA exposure activates 90013 toll-like receptor 90014 (TLR) 4 and TLR7-mediated gene expression, resulting in increased production of many cytokines (such as IL-6), chemokines, and growth factors (ie TGF-b1). R R 90003 90002 Gadolinium is also a potent inhibitor of the 90013 mononuclear phagocyte system 90014 (MPS) and GdCl3 is widely used to kill Kupffer cells in animal models.R 90003 90010 6. Impairs Kidney Function 90011 90002 Gd may cause renal failure or toxicity. R R 90003 90002 For example, a 56-year-old woman with normal kidney function had 2 consecutive vascular imaging procedures with GBCA and a few days later, the patient developed acute renal failure and acute tubular necrosis. R 90003 90002 90013 Nephrogenic systemic fibrosis 90014 (NSF) is a major complication from Gd exposure and may possibly be worse in those with lower 90013 Klotho expression 90014.R R 90003 90010 7. Inflames The Pancreas 90011 90002 Gd has shown to cause acute pancreatitis. R 90003 90002 For example, Gd-induced recurrent acute pancreatitis was reported in a 58-year-old woman administered gadobenate dimeglumine for MRI. R 90003 90010 8. May Be Toxic To The Liver 90011 90002 In humans, Gd has shown to induce hepatotoxicity (vacuolar degeneration, disorganized hepatic cords). R 90003 90002 It can also increase TG, LDL, and VLDL levels while reducing HDL levels. R 90003 90010 9.Alters Blood Homeostasis 90011 90002 Gd may be hematoxic, as it has shown to reduce WBC count in animals. R 90003 90002 Gadolinium also blocks the ability for blood cells to hydrolyze ATP. R 90003 90002 It make the heart more susceptible to phenylephrine (via stimulation of angiotensin II AT1 receptors). R 90003 90002 It also reduces 90013 nitric oxide 90014 (NO) bioavailability. R 90003 90010 10. Inflames The Skin 90011.90000 Symptoms and how to get it out 90001 90002 For many people, the thought of a bug crawling around in their ear is terrifying. Although it is not very common, a bug can enter the ear and even stay there for some time. 90003 90002 There are a few different ways that the bug can get into the ear. It could crawl in overnight while a person is asleep, or fly into their ear when they are spending time outside. 90003 90002 If a bug does get into the ear, it may die right away. However, there is also a chance that it will stay alive and continue to move around.90003 90002 In most instances, a bug in the ear will not cause any significant problems, but it can occasionally lead to complications. Regardless of the dangers, most people want to remove the bug from their ear as soon as possible. 90003 90002 In some instances, a person may not notice the bug entering the ear and may only experience symptoms later on. The most common symptoms of a bug in the ear are pain and discomfort. 90003 90002 The external ear and the outer side of the eardrum have several cranial nerves that relay information to the brain.A foreign object, such as a bug, can irritate these nerves. 90003 90002 The insect might still be alive and may be crawling or buzzing, which could cause odd sensations in the ear. 90003 90002 Depending on the type of bug, it may also repeatedly bite or sting while it remains trapped in the ear, which can be very painful. 90003 90002 Additional symptoms of a bug in the ear may include: 90003 90020 90021 a feeling of fullness in the ear 90022 90021 swelling 90022 90021 bleeding or pus draining from the ear 90022 90021 hearing loss 90022 90029 90002 It is essential to stay calm when trying to remove a bug, be it from someone else’s ear or your own.90003 90002 Although having a bug in the ear is unsettling, becoming anxious will only make the situation more difficult. 90003 90002 To remove a bug from the ear, follow these steps: 90003 90020 90021 Tilt your head to the affected side and gently shake your head to dislodge the bug. Do not hit your ear as this can lead to additional problems. 90022 90021 If the bug is still alive, try pouring a tiny amount of vegetable oil into the ear to suffocate it. 90022 90021 If the bug is dead, try to flush it out of the ear using warm water.90022 90021 Avoid sticking tweezers, cotton-tipped swabs, or other objects into the ear. these can push the bug further towards the eardrum, potentially leading to injuries and hearing loss. 90022 90029 90002 If the bug is in the ear of a child with a history of ear problems, including frequent infections, tympanostomy tubes, or a perforated eardrum, it is best to see a doctor as soon as possible rather than trying to remove the bug at home. 90003 90002 When attempting to remove a bug from the ear at home, it is vital not to stick anything inside the ear, such as a probing object or a cotton swab.90003 90002 Sticking something into the ear can push the insect further inside, which can lead to long-lasting damage. 90003 90002 A study has shown that various complications are more likely to occur when an untrained person tries to remove something from their ear. 90003 90002 Potential complications include cuts and bruising to the external ear canal, as well as ruptured eardrums. 90003 90002 When it is not possible to remove a bug from the ear at home, it is essential to see a doctor as soon as possible to prevent complications.90003 90002 A bug left in the ear may continue to sting or scratch, which could cause inflammation or a ruptured eardrum. Infection is also a risk. 90003 90002 The doctor will look inside the ear with an instrument called an otoscope. 90003 90002 If the bug is alive, they will usually kill it using mineral or olive oil before flushing it out of the ear with sterile water. 90003 90002 If it is difficult to flush out, they may try to grab it with a pair of tiny forceps. 90003 90002 A person will rarely require anything more than local anesthesia to keep them still and calm while the doctor removes the bug.90003 90002 In one study that looked specifically at people with a foreign object in the ear, only 13.6 percent required general anesthesia for the removal procedure. 90003 90002 In 86.4 percent of cases, the doctor removed the foreign body using forceps, suction, a probe, a fine hook, or an ear syringe, with or without local anesthesia. 90003 90002 Pain and other symptoms usually subside quickly following the removal of the bug. If any stings or scratches result in inflammation, it can take a few days for the swelling to resolve.90003 90002 In some cases, antibiotic medication might be necessary to prevent an infection. 90003 90002 There is no way to ensure that a bug never crawls into the ear, but people can take a few steps to reduce the risk. These include: 90003 90020 90021 wearing insect repellent when spending time in the countryside 90022 90021 wearing earplugs when camping 90022 90021 keeping the home clean to reduce the likelihood of having insects indoors 90022 90029 90002 If a bug does get into the ear, it is often possible to remove it using simple home remedies.If these do not work, it is essential to see a doctor as soon as possible. 90003.